

/ How to Quickly Deploy Docker via TerraMaster NAS?
To make it easier for users to use and manage Docker and containers, TerraMaster has designed a friendly user interface for Docker in TOS. Please configure and employ Docker according the guidelines of Help files.
Installing the Docker Application
To install the Docker app, visit the TOS App Center, locate the Docker app, and then click “Install”.
How to Create a Container
At the outset, you’ll need to double-click the Docker app to open it. Then, click the “Registry” option. To make it easier for you to find an image, TerraMaster integrates Docker Hub with Docker. Docker Hub is the largest repository of Docker image files, and image files in Docker Hub are customized and uploaded by other developers.
To continue creating your container, follow the steps listed below:
1. Use the search bar to enter the image file keyword you want to find, and then click “Search”. 
2. From the search results, select the item you want to download, and then click "Download”. The download will complete automatically, and the downloaded image file will be added to the “Image” option.
3. Most of the time, container creation requires variable settings, and these are typically provided by developers. If you need to know about the setup information for an image file, click the arrow symbol to the right of the image file.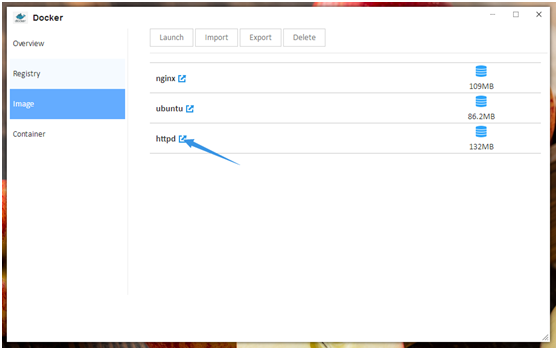
4. Select the downloaded image file in the “Image” option, and then click “Launch”.
5. Use the pop-up menu to name the container, and then complete the settings in the “Settings” menu. Please note that container names must be unique (i.e., don’t use the same name for two containers). When the setup is completed, click “Apply”.
6. After successful launch, containers will appear in the “Container” option.
7. Click "Details" in the "Container" option, and on the “Details” page, you can view information such as the container's health, ports, volumes, networks, and more. You may need this information when you are using containers.
Note:
- Before you create a container, it is always recommended that you read the information page for the image file. This is because when creating the container, you are likely to need some of this information.
- Since Docker Hub is the largest repository of Docker image files, anyone is free to upload their custom image files. If you cannot create a container with the correct settings, the problem may relate to the quality of the image file. In this case, we recommend that you try a different image file.
EXAMPLE: How to Build an Apache HTTP Web Server
1. Click the "Registry" option, and then enter the keyword "apache" into the search bar. Click "Search."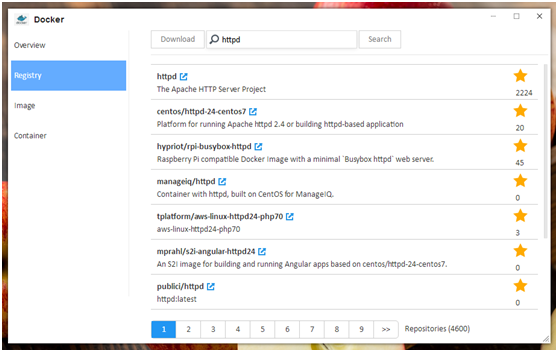
2. From the list of search results, select "httpd". Then, click "Download". The httpd image file will be added to the "Image" option, and the download will complete automatically.
3. Use the “Image” option to select the httpd image file you just downloaded. Before launching the image, click on the arrow symbol (located to the right of the image file) and read the relevant configuration instructions in detail. Then, click "Launch".
4. Use the pop-up menu to name the container. Please note that container names must be unique (i.e., don’t use the same name for two containers). Then, complete the other settings in the menu and click “Apply”.
5. Select the storage path for the Apache web server, and take note that this is where the web server’s file data will be stored. Then, in the “Volume” menu, click the "Add" button. Following this, select
a folder from the list, and then complete the Docker image loading path. Please bear in mind that the mount path needs to be queried in the httpd configuration specification. Here,you can find that the image’s loading path is "/usr/local/apache2/htdocs/" by default. Next, copy the path and paste it in the "Load Path" column. Importantly, don’t check the "Read Only" button option.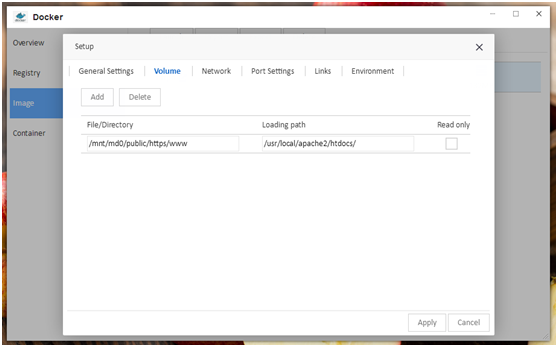
6. Keep the default values for the parameters in the “Network”, “Port Settings”, “Links”, and “Environment” menus. Then, click “Apply”.
7. Click on "Details" in the "Container" option. Next, use the “Overview” option to view the local port number. Please note that the port number will look something like “47739”.
8. To access the root directory of the Apache web server, enter both the TNAS IP address and the local port number in your browser address bar. You should combine your TNAS IP address and the local port number as follows: “192.160.18:47739”, where “192.168.0.18” is the TNAS IP address and “47739” is the local port number. If you can access it, then your Apache web server has been created successfully.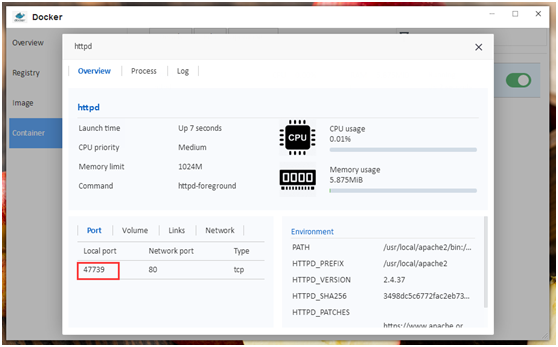
General Settings
Here, we’ll provide an outline of Docker’s setup items and their features.
Overview
From the overview menu, you can view the CPU and memory usage of the containers running in Docker. You can also view the health status of the running containers.
Registry
The registry provides a large number of image file libraries -- Docker Hub, where you can find the image files you need and download them.
To Download Image Files:
1. Enter the name or keyword of the image file in the search bar, and then click "Search";
2. In the search results, select the image file name you want, and then click "Download";
3. If you need to view information about the image file provided by the developer, click the arrow icon located at the right side of the image file name.
Image
The image options show the downloaded image files and the image file size. You can manage your image files here.
To Launch an Image File:
1. Select the image file you want to launch;
2. Click “Launch”;
3. Set up the container and click "Apply".
How Do I Set Up a Container?
General Settings
In the general settings, you can set the following:
- Container Name: You can customize the name of the container. Please note that container names must be unique (i.e., don’t use the same name for two containers).
- Resource Limit: Enable this option if you need to limit container possession of CPU and memory resources.
- Automatic Restart: Enable this option if you want the container to restart automatically when an exception occurs.
Volume
In the volume options, you can make the following settings:
- Add or remove files or folders: Files or folders, located in the TNAS storage space, are used to store container data;
- Configure the loading path of the container for the file or folder;
- Select whether you want to assign read-only permissions to certain files or folders.
Network
This option is used to configure the network of containers. The Docker app provides containers with two network configuration options by default: Bridge and Host. Containers on the same network can communicate with each other.
Bridge: Bridging network, independent network segment;
Host: The same network segment as the Docker’s host.
Port
You can add or remove network ports for containers.
Links
You can create links between different containers, and also add or remove links for containers.
Environment
You can add or remove environment variables for a container.
To Import an Image File:
1. Click “Import”;
2. Select the image file from the storage directory in the pop-up menu, and then click "Apply".
To Export an Image File:
1. Select the image file you want to export from the “Image” menu, and then click "Export";
2.Select the storage directory for the image file in the pop-up menu, and then click "Apply".
To Delete an Image File:
1. Select the image file you want to delete from the “Image” menu;
2. Click “Delete”.
Container
You can use the container options to view the operation of the containers and manage them.
To find out about the details associated with a certain container, select the container and click “Details”. Using the menu, you can access the following information:
1. Overview: Displays the health of the container, CPU and memory usage, and the container configuration;
2. Process: Displays the task process for the container;
3. Log: Displays the logs run by the container.
If you want to edit a container, select the name of the container, and then click “Edit”. Please note that before editing the container, you need to stop it from running.
The Following Operations Can Also Be Performed:
- Start a container;
- Stop a running container;
- Restart a container;
- Delete a container.