

How to set TNAS as VPN server?
VPN Server
With VPN Server, you can easily turn your TNAS device into a virtual private network (VPN) server. This will give users secure Internet access to shared resources on the TNAS local area network (LAN). VPN Server integrates the three most commonly used VPN communication protocols, PPTP, OpenVPN, and L2TP/IPSec,to allow you to establish and manage VPN services. To select one of the following types of VPN server and enable VPN services on your TNAS device, please install and start the VPN Server application.
To install VPN Server, go to the TOS App Center, find VPN Server, and then click "Install".
Overview
Here you can check the PPTP, OpenVPN, and L2TP/IPSec status of yourVPN Server.You can also check whether the VPN service is enabled or not, examine the dynamic IP address assigned to the VPN Server, and check the number of online connections.
Note: After the client connects to the VPN server, use the server’s dynamic IP address for access.For example, if the client is connected to the PPTP VPN server, it will use the PPTP VPN server’s dynamic IP address for access. The default dynamic IP address of the PPTP VPN server is 10.16.12.0.
Settings
You can change the network interface for your VPN connection, or you can set up automatic blocking to prevent unauthorized VPN logins.
To set up the network interface for a VPN connection:
1.Select the interface from the "Network Interface"dropdown menu.
2. Click "Apply".
To set up the account type for a VPN connection:
1. Select the account from the "Account Type"dropdown menu.
2. Click "Apply".
To prevent unauthorized logins with "Auto Block":
Click "Settings" to go to the "Auto Block" page, and then change the relevant settings.
List of online connections
Here you can view alist of all online connections to clients.You can also disconnect any of the clients.
To manage the list of connections, do any of the following:
1. Click "Refresh" to update the list.
2. To disconnect a client, select a client from the listand click "Disconnect".
Authority
Authority is granted to local TNAS users for access to PPTP, OpenVPN, and L2TP/IPSec.The password for user access to the VPN server is also set here.
How to grant VPN access authority to a user?
1. Use thesearch boxto find a specific user.
2. Clickthe checkbox to grant PPTP, OpenVPN, and L2TP/IPSec access authority.
3.Set the user's password for connection to the VPN server.
4. Click "Apply".
Logs
Changes to each VPN client connection and VPN server settings are logged.
To manage log records, please do any of the following:
- Select PPTP, OpenVPN, L2TP/IPSec, or all in the dropdown menu to view all log records.
- Click "Delete" to delete the log record.
- Click "Export Logs" to export logs in the format of a CSV file.
- Click "Refresh" to update the log record
- VPN SERVER
Drawing onPPTP, OpenVPN, and L2TP/IPSec,VPN server allows you to enable and manage VPN services in a straightforward and convenient way.
A popular VPN solution is point-to-point tunneling protocol (PPTP).It is supported by almost all clients, including Windows, Mac, Linux, and mobile devices.
To start the PPTP VPN server:
1. Open "VPN Server", and then go to "Settings">"PPTP" in the left panel.
2. Check "Start the PPTP VPN server".
3. Specify the virtual IP address of the VPN server in the "Dynamic IP Address" field. See "About Dynamic IP Addresses" below for more information.
4. Set "Maximum Number of Online Connections" to limit the number of simultaneous VPN connections.
5. Choose a way to authenticate VPN clients and the VPN server,using the"Authentication"dropdown menu.
- PAP:No password will be used to validate the authentication process between VPN clients and the server.
- MS-CHAP v2: TheMicrosoft CHAP v2 protocol will be used to validate the authentication process between VPN clients and the server.
6. If you select MS-CHAP v2 for authentication, please choose a VPN encryption method from the "Encryption"dropdown menu.
- No MPPE: VPN connections are not protected by encryption.
- Require MPPE (40/128 bit): VPN connections are protected by 40-bit or 128-bit encryption, depending on client settings.
- Maximum MPPE (128 bit): VPN connections are protected by 128-bit encryption, providing the highest level of security.
7. Set the MTU (maximum transfer unit) to limit the size of data packets transferred over the VPN.
8. Check "Enable Manual DNS", and specify the IP address of the DNS server. If this option is not enabled, the DNS server currently used by TNAS will be sent to the client.
9. Click "Apply" to complete the setting configuration process.
Notes:
- The authentication and encryption settings for the VPN client must be consistent with those of the VPN Server.Otherwise,the client will not connect.
- The value of MTU defaults to 1,300 to maximizecompatibility with most PPTP clients using Windows, Mac OS, iOS, or Android operating systems. If your network environment is complex, consider setting a low MTU value. If you receive timeout messages or frequently have an unstable connection, please lower the MTU value.
- Check your TNAS and router port forwarding rules and firewall settings to ensure TCP port 1723 is open.
- Some routers already have a built-in PPTP VPN service,which occupies port 1723 occupied. If this is the case, you will need to disable the built-in PPTP VPN service through the router's management interface. In addition, certain older routers may block the GRE protocol (that is, IP protocol 47), which causes VPN connections to fail. It is recommended that you use a router that supports VPN passthrough connections.
- If the client cannot access shared resources in the VPN Server LAN after making a successful connection, go to “Control Panel”>“Network Settings” > “Network Interface” to check whether the LAN gateway and DNS server settings are correct.
OpenVPN is a VPN service solution for open source. It protects VPN connections with SSL/TLS encryption.
To start the OpenVPN server:
1. Open "VPN Server", and then go to "Settings">"PPTP" in the left panel.
2. Check "Start the PPTP VPN server".
3. Specify the virtual IP address of the VPN server in the "Dynamic IP Address" field. See "About Dynamic IP Addresses" below for more information.
4. Set "Maximum Number of Online Connections" to limit the number of simultaneous VPN connections.
5. Set "Port" to specify the VPN server port (OpenVPN defaults to port 1194).
6. Select the VPN communication protocol from the "Protocol"dropdown menu.
7. Select the VPN encryption approach from the "Encryption Settings"dropdown menu.
8. Select a way to authenticate VPN clients and the VPN server from the "Authentication"dropdown menu.
9. If you want to compress data while transferring it, check "Enable the VPN Compression Connection". This option canincrease the transmission speed, but it may consume more system resources.
10. If you check"Allow client access to server’s LAN", the client will gain access to theserver's network.
11. Click "Apply" to finish settings.
Notes:
- VPN Server does not support the bridge pattern for point-to-point connections.
- Please check your TNAS and router port forwarding rules and firewall settings to ensure that the TCP/UDP port 1194 is open.
- When running the OpenVPN GUI on a Windows system, UAC (user account control) is enabled by default. If it is already enabled, you need to usethe OpenVPN GUI to create a connection,selecting the option of "Run as an Administrator".
- If the client cannot access shared resources in the VPN Server LAN after making a successful connection, go to “Control Panel” > “Network Settings” > “Network Interface” to check whether the LAN gateway and DNS server settings are correct.
To start the L2TP/IPSec VPN server:
1. Open "VPN Server", and then go to "Settings">"PPTP" in the left panel.
2. Check "Start the PPTP VPN server".
3. Specify the virtual IP address of the VPN server in the "Dynamic IP Address" field. See "About Dynamic IP Addresses" below for more information.
4. Set "Maximum Number of Online Connections" to limit the number of simultaneous VPN connections.
5. Select a way to authenticate VPN clients and the VPN server from the "Authentication"dropdown menu.
- PAP:No password will be used to validate the authentication process between VPN clients and the server.
- MS-CHAP v2: TheMicrosoft CHAP v2 protocol will be used to validate the authentication process between VPN clients and the server.
6. Set MTU (maximum transfer unit) to limit the size of data packets transferred over the VPN.
7. Check "Enable Manual DNS", and specify the IP address of the DNS server. If this option is not enabled, the DNS server currently used by TNAS will be sent to the client.
8. Set the "Pre-shared Password".
9. Click "Apply" to finish settings.
Notes:
- The authentication and encryption settings for the VPN client must be consistent with those of the VPN Server.Otherwise,the client will not connect.
- The value of MTU defaults to 1,300 to maximize compatibility with most PPTP clients using Windows, Mac OS, iOS, or Android operating systems. If your network environment is complex, consider setting a low MTU value. If you receive timeout messages or frequently have an unstable connection, please lower the MTU value.
- Check your TNAS and router port forwarding rules and firewall settings to ensure TCP port 1723 is open.
- Some routers already have a built-in PPTP VPN service, which occupies port 1723 occupied. If this is the case, you will need to disable the built-in PPTP VPN service through the router's management interface. In addition, certain older routers may block the GRE protocol (that is, IP protocol 47), which causes VPN connections to fail. It is recommended that you use a router that supports VPN passthrough connections.
- If the client cannot access shared resources in the VPN Server LAN after making a successful connection, go to “Control Panel” > “Network Settings” > “Network Interface” to check whether the LAN gateway and DNS server settings are correct.
About the dynamic IP address
The number that the VPN server enters in "dynamic IP address" is assigned to the VPN client from an IP address that is chosen from a set of virtual IP address ranges. For example, if the dynamic IP address of the VPN server is set to "10.0.0.0", the virtual IP address of the PPTP VPN client ranges from "10.0.0.1" to "10.0.0.[upper limit of connections]".In addition, the virtual IP address on the OpenVPN client ranges from "10.0.0.2" to "10.0.0.255".
Important –Before specifying the dynamic IP address of the VPN server, please note the following:
1. The dynamic IP address of the VPN server must be one of the following:
- From "10.0.0.0" to "10.255.255.0"
- From "172.16.0.0" to "172.31.255.0"
- From "192.168.0.0" to "192.168.255.0"
2. The dynamic IP address specified for the VPN server, as well as the virtual IP address assigned to the VPN client, cannot conflict with any IP address already in use on the LAN.
Related settings for connectinga VPN client with the VPN server
Before connecting to the TNAS VPN server with the VPN client, the client needs to change the gateway settings. Otherwise, it may not be possible toaccess the Internet after creating a VPN connection.
A method to connect to a PPTP or L2TP/IPSec VPN on a Windows7 computer
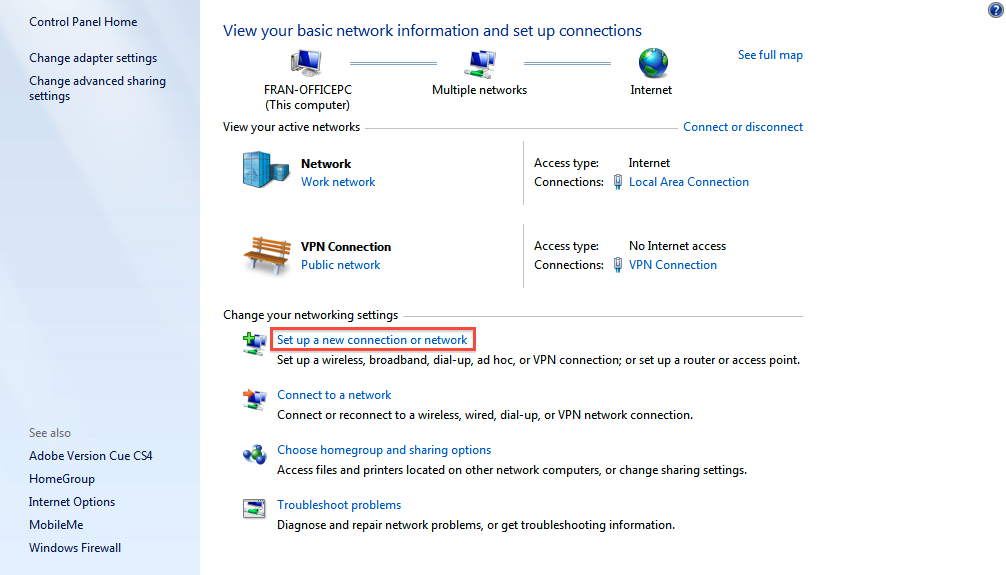
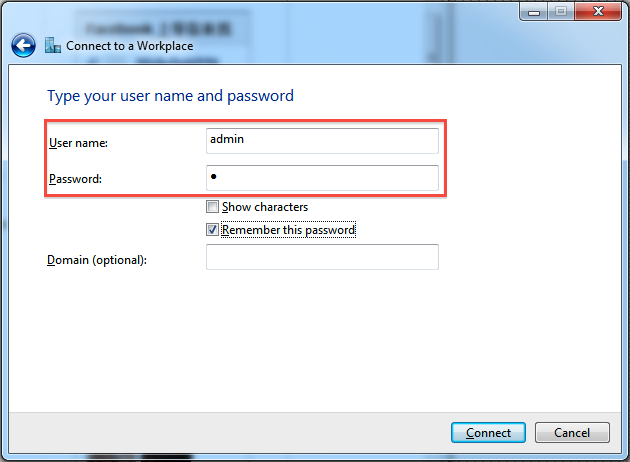
1. On a Windows 7 device, go to "Control Panel" > "Network and Internet" > "Network and Sharing Center".Click "Set up a new connection or network".
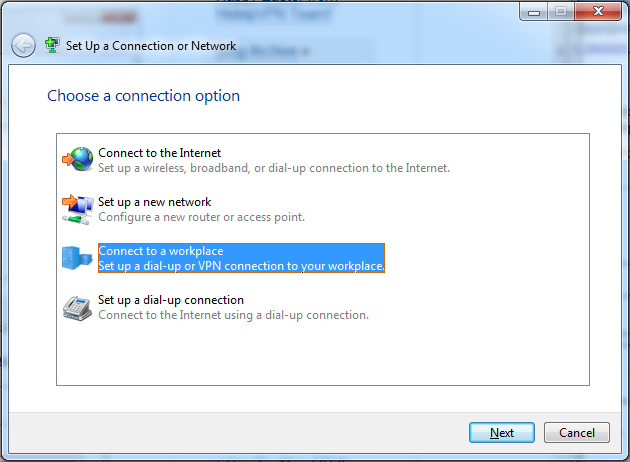
2. Select "Connect to a workspace".
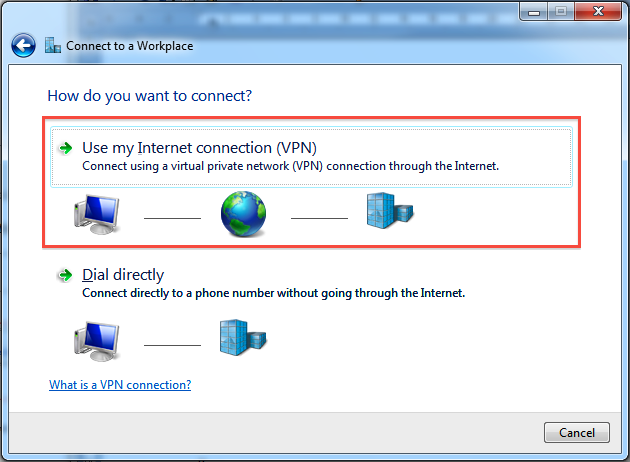
3. Select "Use my Internet connection (VPN)".
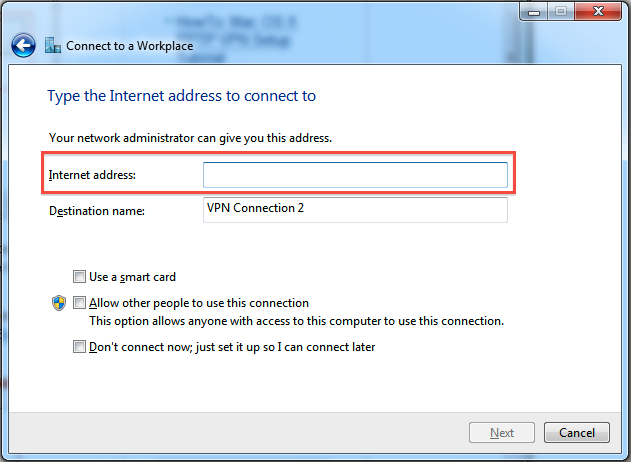
4. Enter the TNAS IP address in the "Internet address" field.
5. Enter your user credentials, and then click "Connect" to connect to the VPN Server.
6. Once you have established asuccessful connection, you can access shared resources in the TNAS LAN.
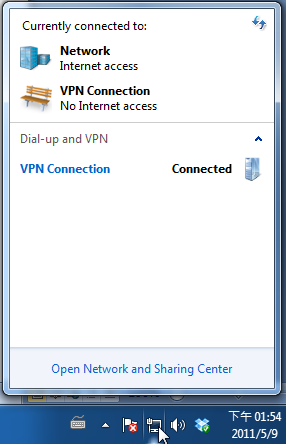
7. To disconnect, click the “Network” icon in the taskbar (see the lower-right corner of your computer). Select the connected VPN and click "Disconnect".
8. If you fail to connect to the VPN Server, select "VPN Connection" and then right-click, select "Properties",and check the settings. Select the "Security" option in the window,and check whether the "Type of VPN” is PPTP or L2TP/IPSec.Then select the data encryption option shown in the figure below.
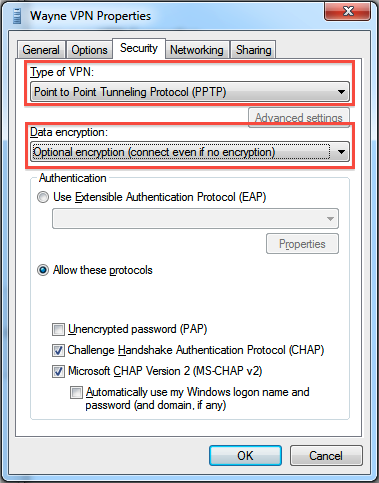
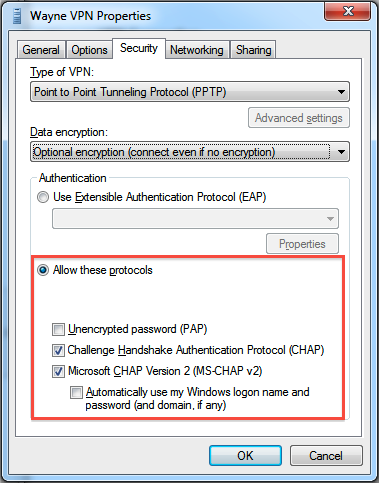
9. Check your "Authentication" settings. Select "Allow these protocols", and tick the protocol that corresponds to the VPN Server.
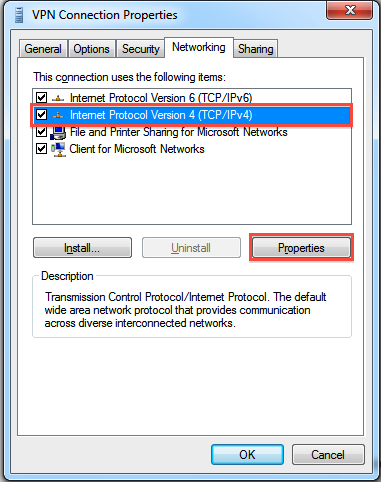
10. Switch to the "Networking" option, and check "Internet Protocol Version 4 (TCP/IPv4)" and “Client for Microsoft Networks”.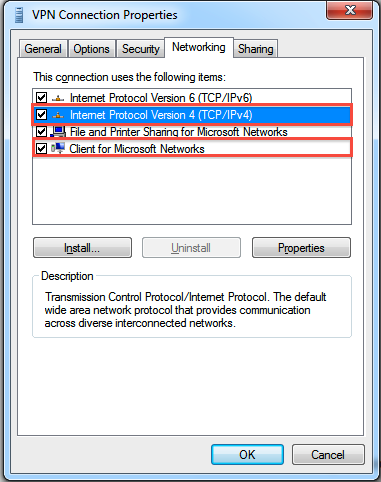
11. Now, all the settings are complete! You are successfully connected to the VPN server.
A method to connect to anOpenVPN server on a Windows7 computer
1. Download and install the OpenVPN application from the official OpenVPN website. In the example below, OpenVPN 2.3.8 is used to demonstrate how to set up an OpenVPN connection.
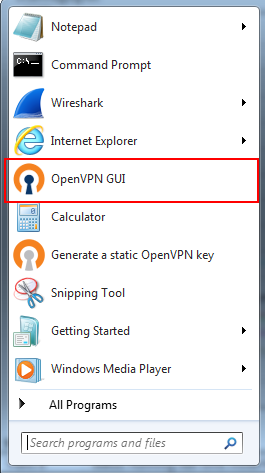
2. After successfully installing the application, you will see OpenVPN GUI in your Start menu. Launch the application as an administrator.
3. Export the configuration files from the OpenVPN option of the VPN Server. Extract the exported files, including ca.crt, openvp.ovpn, and a readme.txt.
4. Open openvpn.ovpn with a text editor.Replace YOUR_SERVER_IP in the file with your TNAS device’s Internet IP address. If your TNAS device is connected to the Internet via a router, please replace YOUR_SERVER_IP with your router's public IP address.
5. Put ca. CRT and openvp.ovpn into asubdirectory named config, under OpenVPN directory(i.e., C:\Program Files\OpenVPN\config\).
6. Double-click the OpenVPN GUI icon in the system tray.

7. Click "Connect", and connect to the VPN Server withthe user credentials.

8. After successfully connecting, you can click "Disconnect" to disconnect the VPN server. After disconnecting, you can also click "Reconnect" to reconnectthe VPN server.
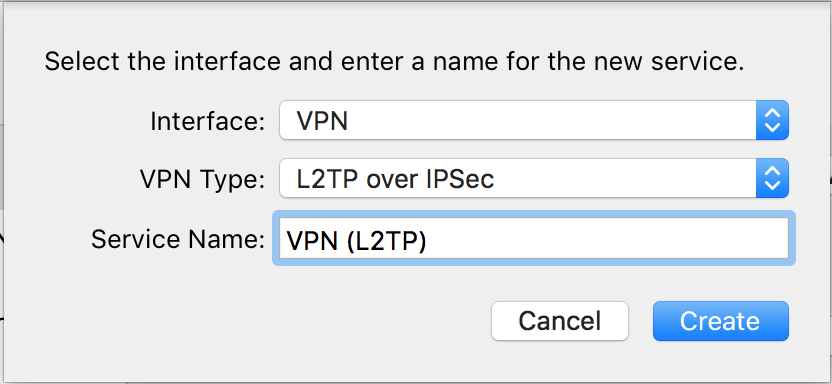
A method to connect to a PPTP or L2TP/IPSec VPN on a Mac computer
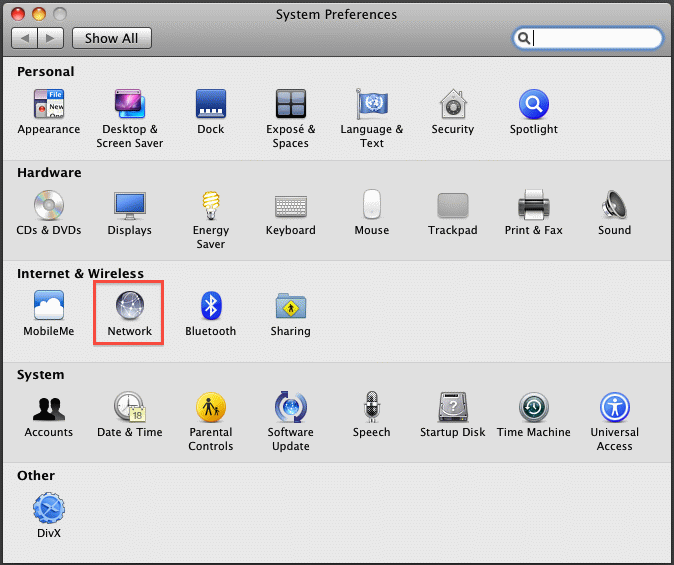
1. Click "System Preferences" in the Apple menu.

2. Click "Network".
3. Click the "+" icon in the lower-left corner to create a new connection.
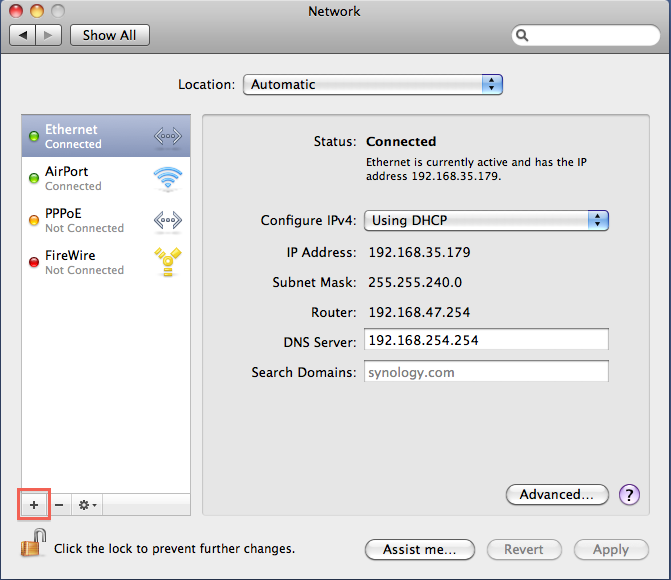
4. Select VPN forthe "Interface" option, and select "L2TP over IPSec" as the VPN type. Name the VPN connection in the "Service Name" field.
5. Enter the TNAS IP address in the “Server Address”field and a valid user account in the “Account Name”field.
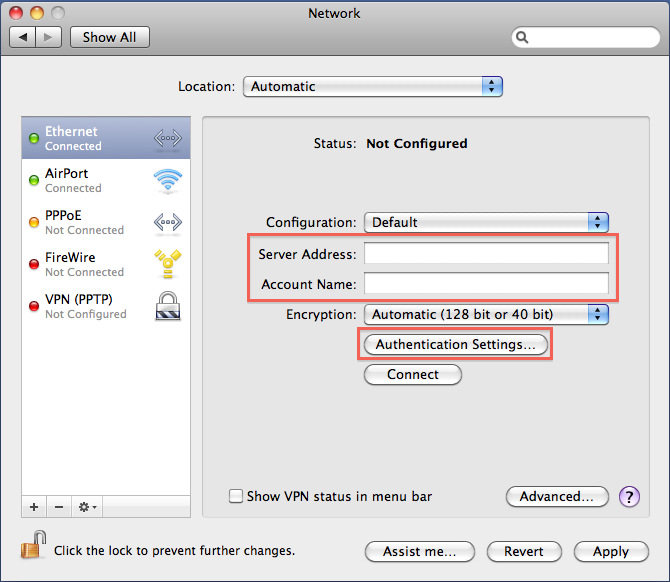
6. Select the encryption type for the VPN connection. Please note that this must be the same as the settings on the VPN Server.
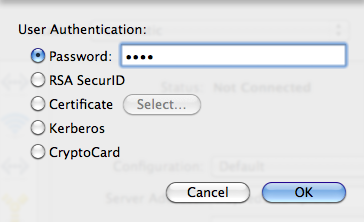
7. Click "Authentication Settings" and enter the user's password.
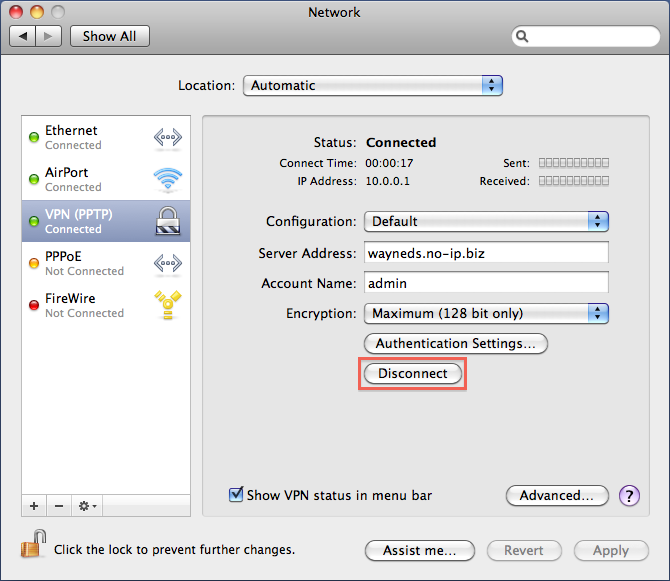
8. Click "Connect" to create a VPN connection. After establishing a successful connection, you can click "Disconnect" to disconnect the VPN Server.
A method to connect to an OpenVPN server on a Mac OS computer
1. Export configuration files from the OpenVPN option of the VPN Server. Extract the exported files, including ca.crt, openvp.ovpn, and a readme.txt.
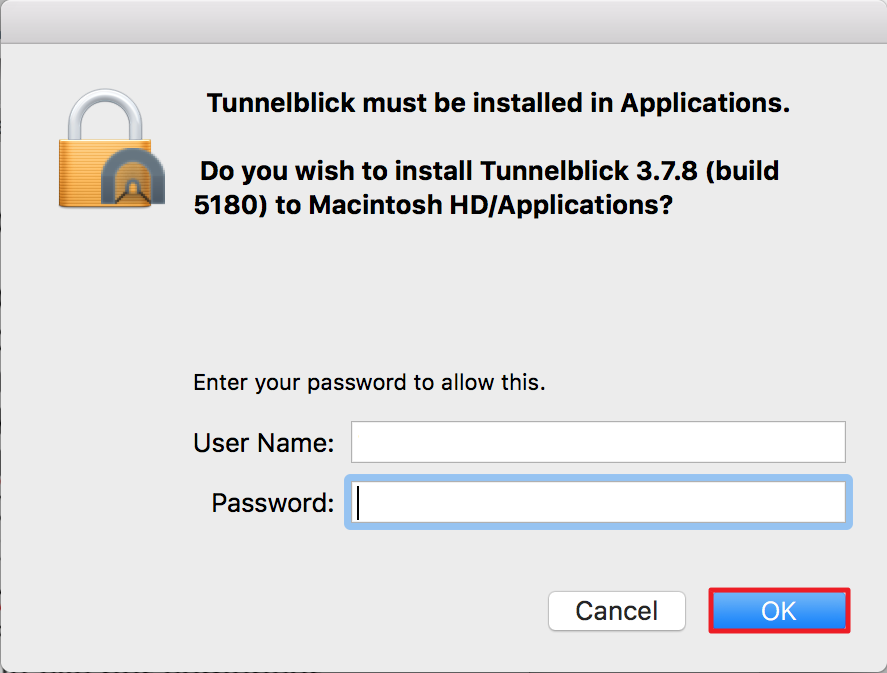
2. Download and install Tunnelblick (an OpenVPN client for Mac).
3. Enter your computer's username and password to install Tunnelblick, and then click "OK".
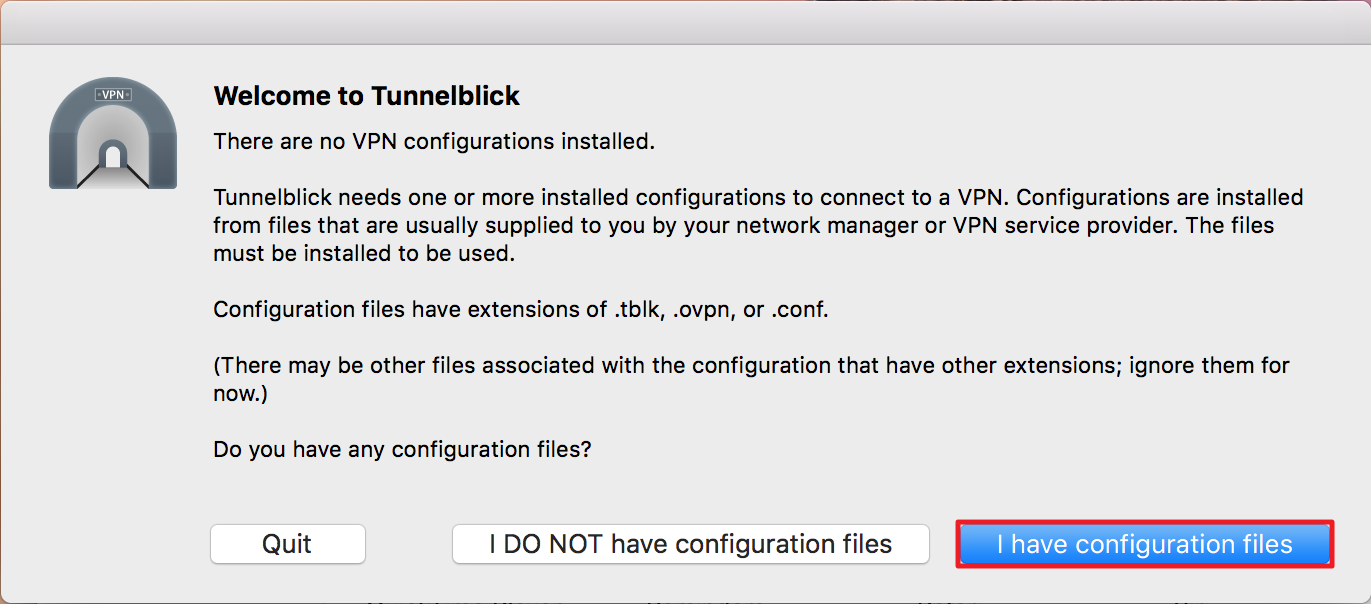
4. Click "I have configuration files".
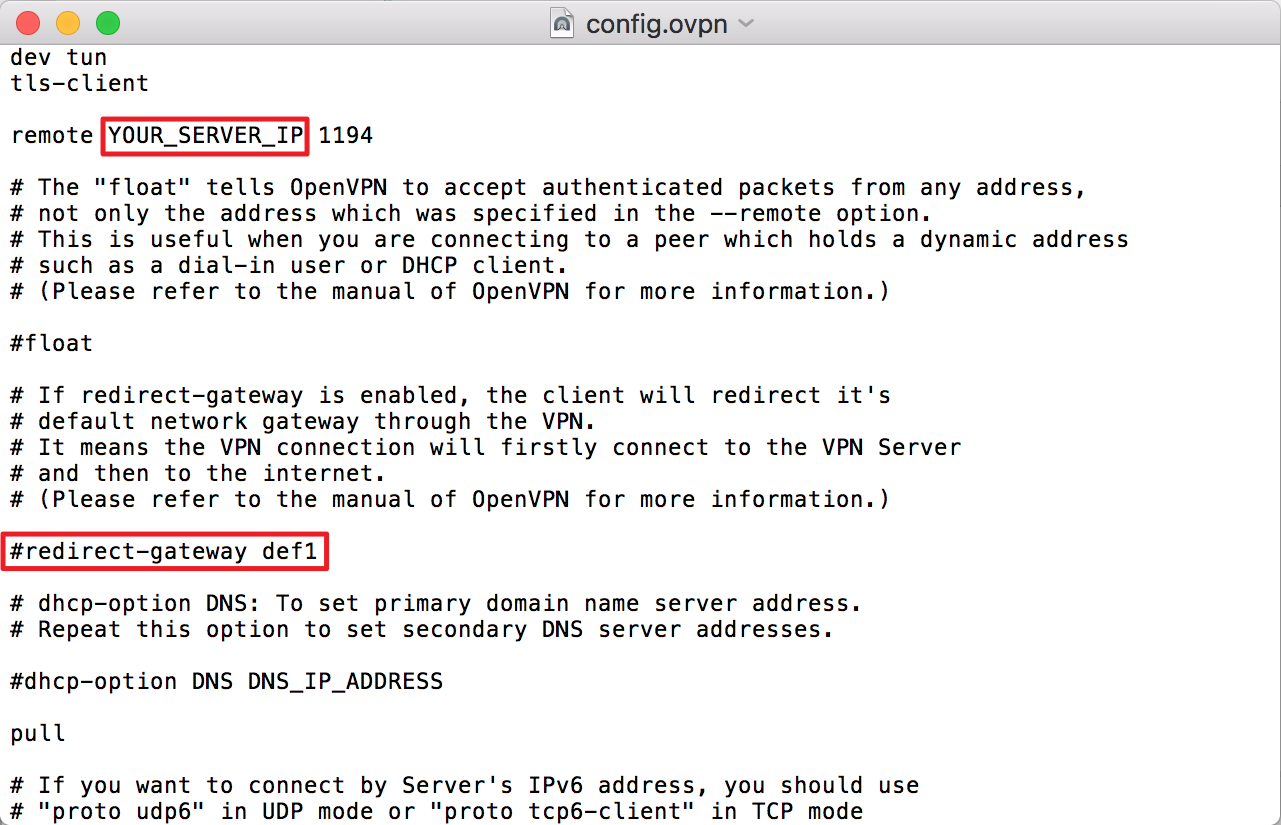
5. Open openvpn.ovpn with TextEdit and replace YOUR_SERVER_IP with your TNAS device’s Internet IP address. If your TNAS device is connected to the Internet via a router, please replace YOUR_SERVER_IP with your router's public IP address. If you want to send all traffic over the VPN, uncomment #redirect-gateway def1 (i.e., by removing the “#”), and save openvp.ovpn when the editing process is complete.
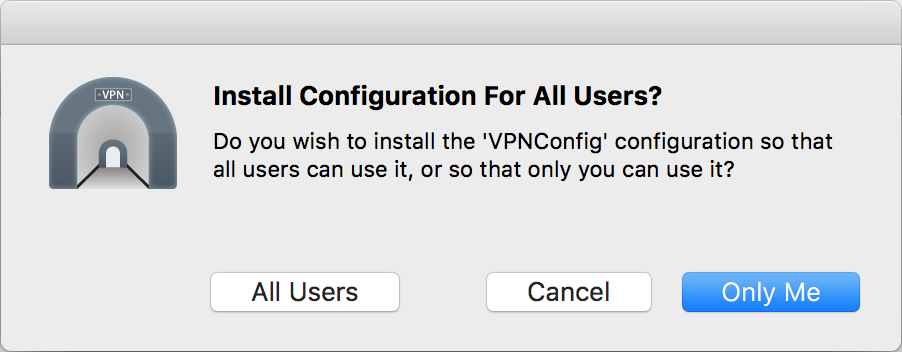
6. Drag the edited openvp.ovpn file onto the Tunnelblick icon on your desktop.
7. Select and install the configuration for user.
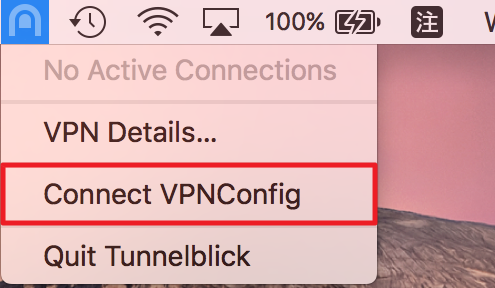
8. Click the Tunnelblick icon, and then select "Connect VPNConfig".
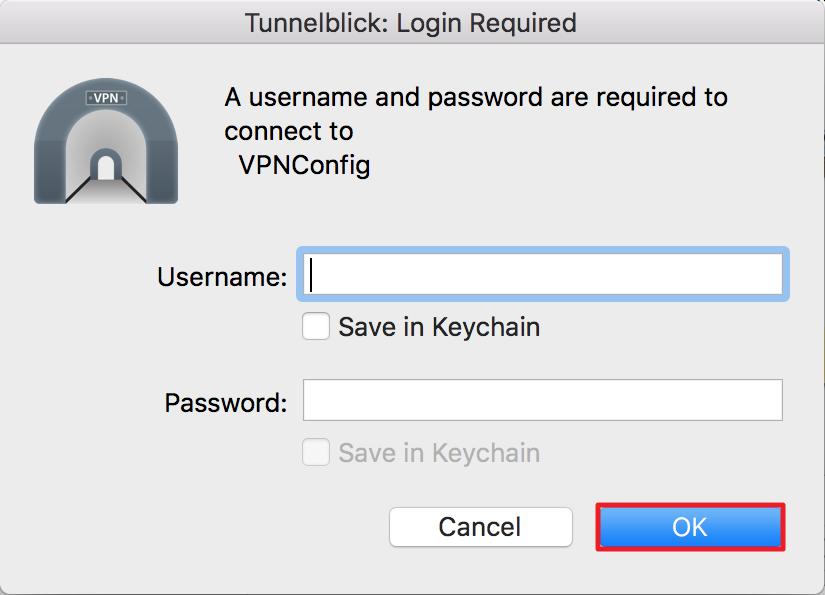
9. Enter the username and password for the VPN server, and then click "OK" to create a connection.
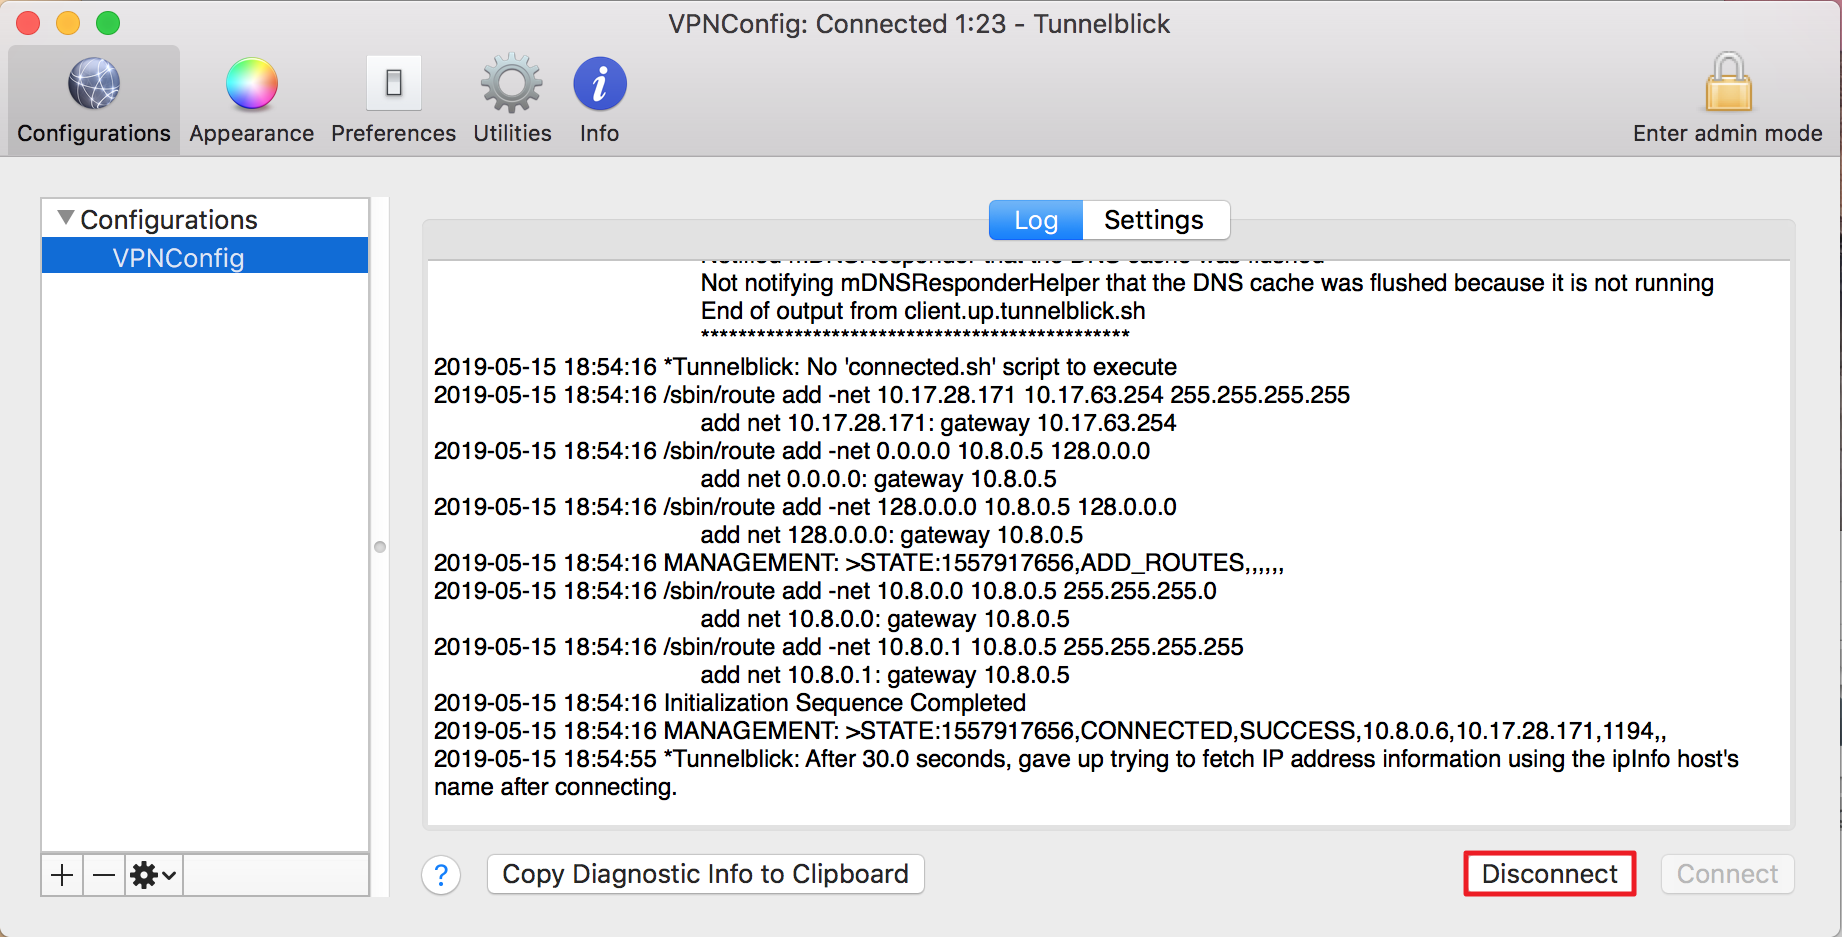
10. Click "VPNConfig" to check the connection status. You may also click "Disconnect" to disconnect it.
Gateway and route settings for the VPN client
For Windows:
When you enable a VPN connection on the Windows platform, the system will automatically treat the VPN connection as the default gateway. All requests to connect to the Internet will be sent via the VPN connection first, which means that you need to connect to the VPN server before connecting to the Internet. In this case, the computer access to the Internet may be slow or unstable. To access the Internet using a local gateway, please follow the steps given below.
1. Click the network icon in the Windows system tray.

2. Right-click the “VPN Connection”, and then click "Properties".
3. Switch to the "Networking" option, and check "Internet Protocol Version 4 (TCP/IPv4)".Then click "Properties".
4. Click "Advanced".
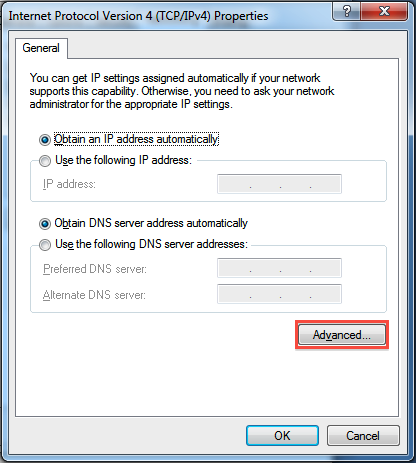
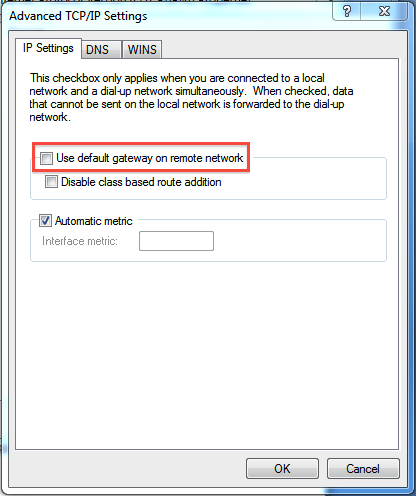
5. It is recommended that you selectthe option "Use default gateway onremote network" under the "IP Settings" in the pop-up window. Alternatively, you can uncheck this and then configure the VPN server's IP address as a static route to the Internet gateway. Once the setup process is complete, both your VPN and the Internet can be accessed normally.
If you have not set the VPN connection as the default gateway, you may not be able to access your TNAS device (or other devices on the LAN) via the VPN. To access your TNAS (or other devices on the LAN), please:
- Open a command prompt in Windows.
- Type ipconfig and hit enter. You should see the following:
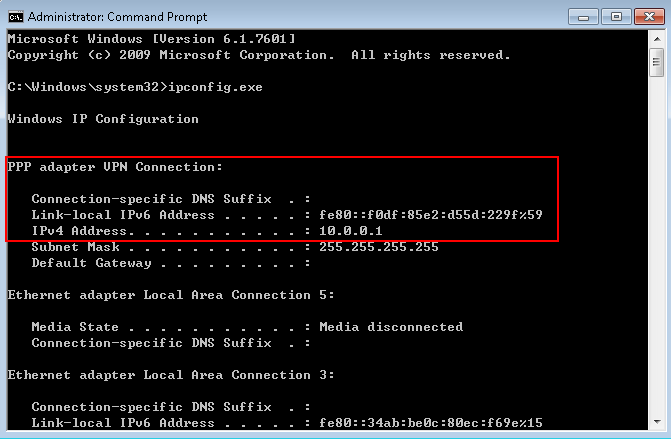
- To access the private TNAS network, run the following command:
>route add 192.168.1.X/24 10.0.0.1
Replace 192.168.1.x with your private TNAS IP address, and replace 10.0.0.1 with your own PPP IP. Now you can access to your TNAS and other devices on the LAN.
For Mac OS:
Mac devices do not automatically treat VPN connections as default Internet connections. When connecting over a VPN, we recommend that you use the approach described below to access your TNAS device and other devices on the LAN. This approach will free you from complex network settings, allowing you to direct all traffic through a VPN connection. In this case, however, the computer’s Internet access may be slow or unstable.
To set the VPN as the default connection:
1. Go to "System Preferences" > "Network", and then click the VPN connection on the left panel.
2. Click "Advanced" > "Option" and check "Send all traffic overVPN connection".
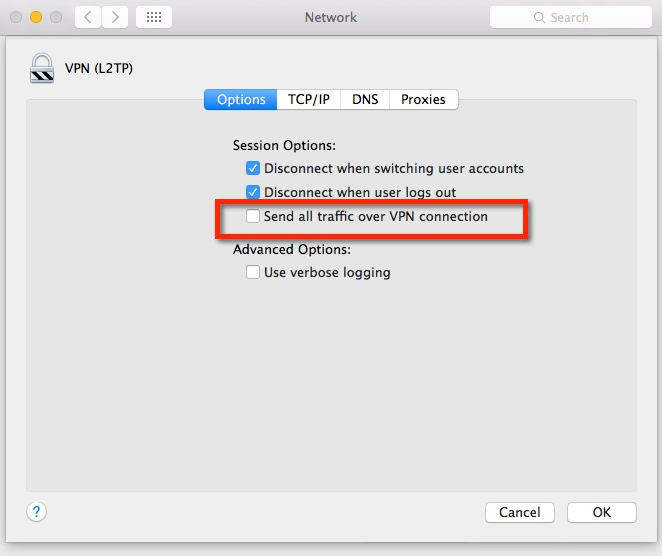
3. Click "OK".
To use the VPN as a non-default connection:
If you want to access TNAS without setting the VPN as the default connection, you need to change the static routing configuration for your Mac device.
1. Run "Terminal" and execute the following command:
> ifconfig –a
2. After hitting enter, you should see the following:
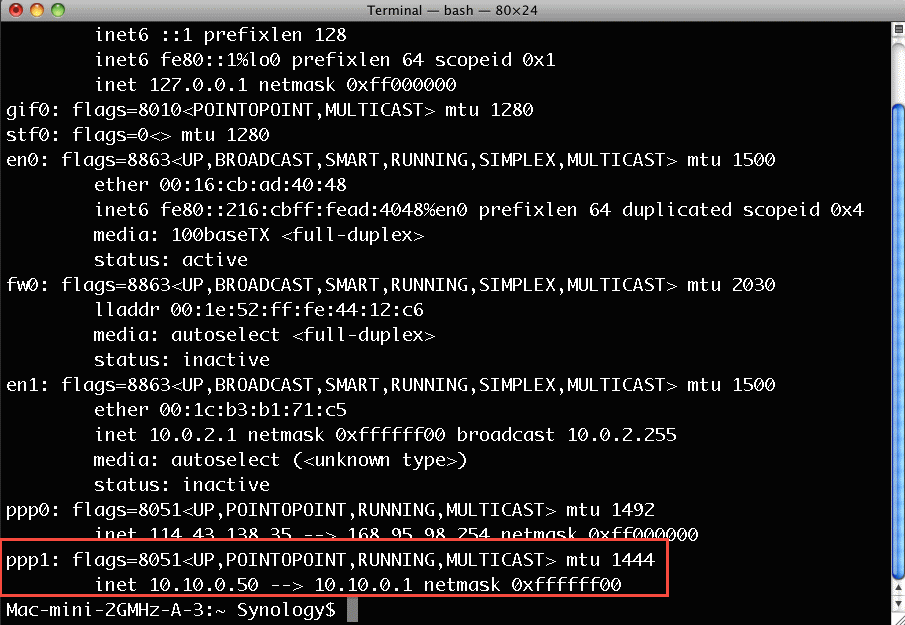
3. On the screen, you’ll see the VPN (PPP) IP address and the gateway. Note that this gateway is only used for VPN server connections, not for connections to the Internet. If you want to connect to your TNAS device via the VPN service, you can add the route by executing one of the following commands:
> sudo route add -net 192.168.X.X/16 10.10.0.50
OR
> sudo route add -net 192.168.X.X/16 10.10.0.1
4. Replace 192.168.X.X with the internal IP address of your TNAS device, and replace 10.10.0.50/10.10.0.1 with your own PPP IP/gateway.
5. Now you can access your TNAS device and your other devices on the LAN via the VPN service.